Thursday, February 13, 2014

February 14th = LOVE: {luv} n.


HAPPY VALENTINE’S DAY !


My DH has been in Germany all week and is expected to return tomorrow. I guess that will really depend on how storm PAX affects travel in the Northeast.  He ordered flowers to be delivered tomorrow but due to the storm FedEx has been making early deliveries and dropped these beautiful roses off this morning.  

I am still attending my photo lessons and decided to do a little practicing. I like taking pictures that have a blurred background...

And I like to try and capture detail, so I photographed the snowflakes falling...


I snapped this picture, adjusting the camera setting each time. Can you see what is happening?


Although the birdhouse remains in focus, the background gets blurrier.  Pretty cool.

I decided to pull a much neglected project out of my WIPs and have made some progress.  Here is a peek...

Thanks for stopping by ~ Have a wonderful Valentine's Day!

Until next time remember....

"Love is the condition in which the happiness of another person is essential to your own."
-Robert Heinlein


Friday, February 7, 2014

Exchange Sent and Received

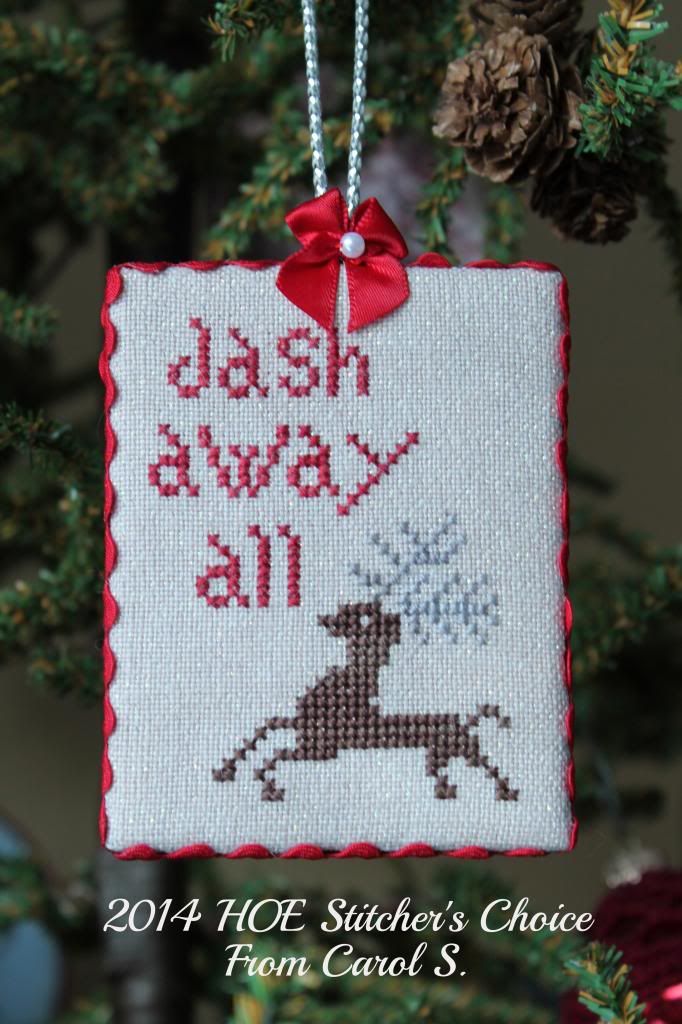
This wonderful HOE Stitcher's Choice exchange arrived from Carol S.

Designer: The Sampler Girl
Design: Dash Away All
Fabric: 32ct Precious Metals Belfast Linen
Floss: Crescent Colours
Stitched by: Carol S.

What a sweet design and so nicely stitched and finished.  I really love the sparkle in the fabric.
Thanks, Carole.  I am so happy with the design that you selected; it's perfect in every way!

Here is the ornament that I stitched for Jayne N.  

Designer: Just Nan
Stitched For: Jayne N.


Primitive Betty's offered a cute freebie on her blog, so cute that I found myself stitching it twice.  The first is the original design, the second has a slight modification...

Designer: Primitive Betty's
Stitched for: Becky K. 

Backing used on both 

Designer: Primitive Betty's
Stitched for: Melissa C.


Tomorrow will be my first ski outing of the season.  This winter has been so cold that I have had little interest in skiing.  Temperatures in the single digit, not to mention negative numbers, does not make for a fun ski day!  This weekend is expected to be a toasty 25 degrees, and with the 10" of new snow that fell on Wednesday I am all set to hit the slopes with my DS. 

Thanks for stopping by and...

Until Next time ~ remember:

There isn't a person anywhere who isn't capable of doing more than he thinks he can. 
...Henry Ford

Sunday, January 26, 2014

A Clever Little Finishing Trick

Do you want to know a little trick on how to stuff those pesky pillow corners?  

I will show you in this Pillow Ornament Tutorial....


1) Stitched Design, Backing, Trim Hanger, Fiberfill


Take care to make sure that the front and back are accurately cut.  This will affect how good it looks when stuffed.

2) Position the hanger and machine baste in place


3) Pin front and back ~ right sides together


4) Pull four small pieces of fiberfill, one for each corner


I like to use Fairfield 100% Premium Polyester Fiberfill.  It has a smooth consistency with no lumps and can be used for all types of crafts.

5) Start at bottom and stitch around the pillow, 
stitching over the fiberfill in each corner. 


Pivot at the corner and continue stitching.
Be sure to leave an opening at the bottom for turning/stuffing


It is important that you are consistent with your seam allowance (I like to use 1/4" SA). This gets tricky when stitching through the fiberfill because the seam allowance is less visible. Slow down at the corners and, if need be, use a stylus to manipulate the fiberfill so that you are able to see the seam guide.  

6) Your pillow should look something like this


7) Press seam allowance at the opening
(this makes hand stitching the closure easier)


8) Turn right side out


9) Place pillow face down on a thick white towel and press.


10) Stuff and hand stitch opening closed.


Stuff from the top down using small amounts of fiberfill.  I start by pulling or *fluffing* the fiberfill 2-3 times prior to inserting it into the pillow.  Use your hand to smooth the stuffed area as you work, this helps minimize lumps. If you tend to stuff firmly, like I do, then care must be taken not to distort the overall shape.

To close the opening I use matching thread and hand stitch it closed using the Ladder Stitch.

There you have it.  The corners look full and the stuffing will not slip out!

Until next time...